The Splendid Sampler Block number 62 designed by Heidi Kaisand released today looks simple enough. It's a great block! But on closer inspection, the block--particularly the corner elements--constructed traditionally--involves sewing along lots of stretchy bias fabric edges. Sewing along bias edges can be tricky. If you aren't careful, the natural stretchy-ness of the fabric could lead to a fair bit of frustration.
Since this is a classic block, that you'll likely see again on your quilty journey, I'm sharing a detailed step by step on how I managed those corner units with great results. With some pretty standards tools.
I won't share all the pattern particulars (you can download the pattern here, only the elements I changed for my block construction. For starters, I upped the size for fabrics C, D, and E. 3-1/2" square for C and 2-1/4" squares for D and E. I cut the C squares in half diagonally as directed, and cut only four of the six D squares in half diagonally, leaving the remaining two D and two E squares uncut. On the two D (or background) squares, I drew a diagonal line corner to corner.
Then I made half-square triangle (HST) units with the background and Fabric E squares. You know the drill - place the squares right sides together - sew two seams 1/4" from both sides of the line, cut apart on the line and press (toward Fabric E). I used my 3-1/2" Blocloc tool to trim the resulting HST units to 1-3/4" square. While I LOVE my Blocloc HST trim tool, a regular square ruler will also allow for an easy trim when lining up the bias seam with the bias line on the ruler.
Next, I sewed one background HST (one of the four D squares that were cut in half diagonally earlier) to the side of each HST as shown. Press toward the triangle and trim the point.
Then use a straight ruler that has a bias (45˚) line and a really clear 1/4" marking - the pointer AND the red arrow are pointing to the 1/4" marking on the ruler (my favorite tool for this job is the 4-1/2" by 8-1/2" Creative Grids ruler because the gripper texture on the bottom of the ruler holds that bias edge steady as you cut). Trim that tiny bit of extra fabric to the right of the ruler edge. It's not a lot, but that little trim will make all the difference for this block!
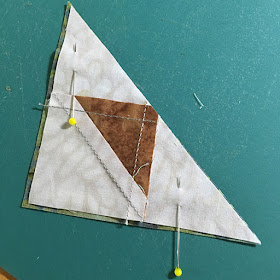
Place the larger (Fabric C) HST underneath the freshly trimmed unit, centered, right sides together, with the bias edges aligned. Notice that the outer edges of the triangles don't align. And that's what we want! Secure with pins to keep the 'stretchy-action' to a minimum and sew a scant 1/4" seam along the bias edge carefully with the pieced unit facing up. Watch as your scant quarter inch stitching travels right over the seam intersection (the one in the brown fabric) or ever so slightly to the right of it, and your point will be guaranteed!
Press the seam toward the larger triangle, and trim the HST unit to 3", centering the seam intersection smack in the middle of the unit (1-1/2" from each edge) - again my favorite HST trimming tool for this job is the Blocloc, but a square ruler with a prominent bias line will do nicely, too.
Note that if all your seams were sewn properly, you'll only have a tiny bit of fabric to trim away. Look how perfect that unit is!
The rest of the block is easy - basic 9-patch construction.
Happy Stitching!
Joan Ford


Nice block!! I'll have to try this!!
ReplyDelete