Thursday, June 14, 2012

A Summer Challenge!

On Sunday, I headed north to Clayton, New York, right on the St Lawrence Seaway. It was a perfect summer day and the North Country Quilt Guild of Watertown, New York had their quilt show at the Clayton Arena. It was a great show (as always) with beautiful quilts, many vendors, and the opportunity to chat with good friends.

Here's one of several antique quilts on display. This one dates to 1880-1900.
 
Our party of three - Gail, Marcia, and myself - stopped for a pretty awesome lunch at Bella's. Our outdoor table was ideally situated overlooking the Seaway and a small section of the 1,000 Islands in absolutely perfect weather.


At the show, I was drawn to a table set up along one side where a unique community service project was on display, featuring orphan blocks.

Once I got home, I couldn't stop thinking about the orphan block quilt project. You could say I was inspired to take the idea to my own stash of scrap fabrics and partially constructed blocks. 

It got me thinking that this might make a nice challenge for the summer - for myself, then I thought maybe YOU'd like to join in, too! Are you up for a little summer challenge? Keep reading!


So, what are "Orphan Blocks?" You start a quilt with all the best intentions, you finish a few blocks, then lose interest in the project. Or you are distracted. Life happens. With only a few blocks complete, the project falls off the to-do list. And all of the sudden you have blocks that really don't belong. Does this sound familiar?

The guild seems to have created a terrific solution to this common quilter's problem. Instead of lamenting over the cast-off blocks, the guild members decided to collect them. From anyone. No orphan is refused.

The blocks are sorted by color, theme or size. Several blocks that really didn't 'go' together, now 'go' together and become a cohesive quilt project.


Three sample quilts made from "Orphan" blocks


The more orphan blocks collected, the better the chance that blocks will find coordinates. A strip of color is added here and there to complete the quilt top. Members with long-arm quilting machines volunteer their services and the quilt is complete. Ready for community giving.

Isn't this a great idea? Everybody wins!

So, I got to thinking . . . What about my stash? I know I have orphan blocks floating around in there. Some of them leftovers from ScrapTherapy patterns, some of them ScrapTherapy projects that never made it past the drawing board. Some of them are just there, leftover from who-knows-what.

These four-patches, for example. There must be fifty of them! They were leftover 2" strips from samples I made years ago. At the time, I sewed two strips together,
cross-cut them, then made four patches, and stowed them. Handfuls of them have fabrics that match, some are scrappy. None of them are doing anybody any good in their current form.

Now what? So I was thi
nking. This would make a good challenge for summertime. How can I convert some of these orphans into something useful, if not for me, then for someone as a gift or donation?

You wanna play? Summer starts in exactly one week. Would you like to join in? I'm not very big on rules, but maybe we should set up some guidelines. We'll 'start' officially on the first day of summer, and I'll post photos of my progress. Join in any time!

Guideline number 1. Start small. It's summer after all, and nobody wants to fling a king sized quilt around their sewing table. Start with one something. One block, One collection of four-patches, one . . . ?

Guideline number 2. Whatever becomes your inspiration or 'orphan' block must have at least one seam sewn. Examples: a half-square triangle unit, a four-patch, a completed block or a partially completed block. You can start with more than one of any of these, but whatever 'it' is has to have come out of your stash with at least one seam already sewn. Exception: if you really don't have any orphan blocks, make something from your scraps, a four-patch for example - the key is to start with something you already have. Adding new fabrics is allowed! Using stash or scraps, even better!

Guideline number 3. Make it fun! Start any time. Nobody needs stress in the summer. No one is supervising you. There will be no quiz at the end of the summer. If you don't make any progress one week or another, that's fine. This is a guilt-erasing, not guilt-creating challenge. Even if you make one new thing from one abandoned quilt block, that's one more than you had before summer started!

Guideline number 4. Share. Send pictures before you start sewing. And keep us posted on your progress. And I'll post pictures of what's happening on my end. It has been said that one of the tricks to accomplishing goals is to share them. 

Who knows where this will go? Think about it this way, if you turn one orphan block into something each week of the summer, just think how many projects you'll have by September!

Are you up for the challenge? 

Happy Stitching!
Joan

Tuesday, June 5, 2012

Gotta Love Hummingbirds!


They're back!

Just a few short weeks ago, right before I headed out of town for International Quilt Market in Kansas City, the first hummingbird of the season was spotted at the hummingbird feeders in my yard. Right now, the honeysuckle plant at the end of our front porch is a riot of fragrant blooms, and the hummingbirds are having a field day, visiting frequently.
Honeysuckle in bloom

These tiny creatures make an amazing journey all the way from Central America each Spring just to visit my feeders and my garden! Okay, maybe they have a couple of other things in mind too - like making little hummingbirds. Anyway, I love seeing them so much, I named my design company after them!

At Quilt Market, the hummingbirds made a significant showing on the Hummingbird Highway.

About 50 handmade, scrappy hummingbirds flocked to booth 1210 and were suspended above visitors' heads for the duration of the show!

Do you want your own quilty hummingbirds? They're fun and easy to make and you can have your very own pattern - for free! Just download it here from the Hummingbird Highway website! Then follow the easy steps shown below to begin your flock!


How-To:

Go to your ScrapTherapy bin and select two coordinated 5" scrap squares. One will be the hummingbird body and one will be the wings. Cut each scrap in half, one diagonally for the body and one across the middle for the wings.

Trace the shapes on one side of the fabrics with a heat-eraseable pen, like a Frixion pen. Center the smaller shape inside the larger shape.

Layer with batting - I like using wool batting scraps because it's nice and fuffly. Pin baste, then quilt on the inner line.


Trim all shapes - two wings and a body - on the outer line.


Sew the wings to the body using two miniature buttons.


Add a hanger loop through the top of the bird body between the wings. Test the placement before you knot the loop so the hummingbird hangs straight.

Yay! These hummingbirds won't migrate in the fall, either.

Happy Hummingbird-Making!
Joan

Thursday, May 24, 2012

Spring Quilt Market Redux

Last Monday, after packing the car in the morning, Marcia and I set out for Spring International Quilt Market in Kansas City, Missouri at around mid-day. Smiley Scrap came along to capture some highlights.

Our first stop: Cleveland, Ohio. The hotel offered free cookies at check-in for a quick snack. From the looks of it, Smiley agrees with the sentiment printed on the cookie bag!

The next day, we headed to Kansas City, Missouri, our destination. Along the way, we just HAD to stop for a cherry-lime route 44 at Sonic (forty-four ounces of yummy lime-infused cherry soda). You just have to take one look at Smiley to know we got the happy hour deal!

Of course, if you drink 44 ounces of anything, eventually, you'll have to make a McStop! (Wow, gas is pretty cheap here!) By the way, we were fortunate to have beautiful driving weather along the entire trip to Kansas City!


Ahh. The street banners are out to greet us in front of the Convention Center - the Quilt Market hot spot for the week end!


Booth set-up went pretty smoothly. Smiley's main role was to supervise and keep us happy. (It worked!)

Smiley took advantage of a little down-time in the booth to wander about. Many of the fabric manufacturers seem to be going 'big' with licensed images. Smiley met Darth Vader and Chewbacca at the Camelot Cottons booth.

 
You could find Linus and the Peanuts gang hanging out with the Quilting Treasures folks!

Smiley thought about joining the circus over at Michael Miller Fabrics. But you have to be so careful where you step!


Smiley clearly felt the most comfortable in the Andover booth, and Eric Carle's 10 Little Rubber Ducks fabric line. Now, these are critters she can really relate to!


After all that walking from booth to booth, a piece of scrap fabric can get worn out! A stop in Ellen Medlock's booth and a nice soft place to set a spell. Aren't the fabrics in Ellen's new line pretty? (The line needs a little more yellow, don't you agree?)

There's Kim DeCoste, Quilts, Inc. Manager of Education, and Shelly Stokes chatting at the Cedar Canyon Textiles Booth. I think these three are strategizing over how to get Smiley in on the Class Schedule for Fall Quilt Market! Smiley also really liked the Paintstik demo with Shelly!

Marti Michell stopped by the booth for a quick camera snap!

Hope you enjoyed the little tour. It's amazing how long it took to assemble the booth just right. And how quickly it was stuffed back into boxes and loaded into the car for the return trip.

Happy stitching! And Happy Memorial Day!
joan

Wednesday, May 23, 2012

Half-Square Triangles

Something Fishy Quilt


Two of the most popular ScrapTherapy patterns, Something Fishy (pictured) and Pick-A-Pair Pot Holders were originally written to incorporate Star Singles, a notion that is similar to Thangles. Thangles use strips of fabric to make half-square triangle units. Star Singles papers start with Squares. Star Singles papers are also similar to triangulation templates that you can print on your home printer.


I love using Star Singles papers. All the trimming to produce the correct unfinished half-square triangle size is done before pressing the seams. But they are difficult to find. 

On the "Good News" side of things I met Liz Eagan (the Star Singles designer and manufacturer) at Spring Quilt Market last week, and she tells me that she's got some plans to make Star Singles more accessible. So stay tuned, in the meantime, here's an alternative.


When ScrapTherapy, Cut the Scraps! was written, the Something Fishy pattern was included, but the pattern was re-written to exclude the requirement for any extra notions. Additionally, In the North Woods, from the book, incorporates a similar notion-free method to make eight Half-Square Triangle units from two 5" scrap squares.

Here's how it works.
Start with two 5" squares. Draw two diagonal lines, corner-to-corner on the back of one of the squares and place them right sides together.


 Sew a 1/4" seam on both sides of each lines. That's four seams all together.


Cut through the center, 2-1/2" away from the edge, twice. Like a big + sign. Then cut on the diagonal lines. Like an X. Try not to move the fabric in between cuts, so you can turn your mat and make four nice clean cuts.
 

Take the 8 resulting triangle units to the ironing board and press the seam toward one side or the other per the pattern instructions.


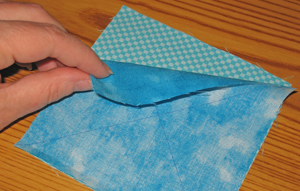
Then trim each unit using a small square ruler that has a bias line to 2" square. Use the 2" markings on the ruler to make sure you are trimming to the correct unfinished size, and line up the bias line on the ruler with the seam in the fabric.

Cut along the side and top, then flip the fabric square and trim the remaining two sides. Don't take a short-cut and trim only two sides, leaving the other two sides all wonky.


Ta-Da! 

Eight perfect Half-Square Triangle units! Each Half-Square Triangle unit is exactly 2" square unfinished. Once sewn into your quilt, it will be 1-1/2" square.

Happy Quilting!
Joan

Thursday, May 3, 2012

Oh, Shoot!

Last Sunday afternoon, I jumped in the car and headed southeast, toward Newtown, Connecticut, headquarters of The Taunton Press. I loaded about a kajillion finished quilts for the next ScrapTherapy book, a bunch of samples for the procedural shots, and my iPad, loaded with two audio books to pass the time on the five-hour drive. 
 

By the time I arrived in Newtown, a lovely, picturesque New England town, I was worn out. Last week, my time was dedicated to finishing up text and illustrations for the third round of book content submissions. So, imagine my delight to see my accommodations at the Dana Holcombe House in Newtown, right in the center of town next to a white spired church.
The Dana Holcombe House, Newtown, CT


The inn is surrounded by a beautiful garden, carefully tended by the inn's proprietors John and Jane Vouros. The lilacs, my all-time favorite flower were just starting to bloom.


The blue room, furnished tastefully with antiques, a fluffy bed, and lots of sunny windows was a welcome sight. I could have stayed all week! Don't you think a handmade blue and white quilt would make a lovely addition?


The next morning. I was off to Taunton headquarters. And found this bookshelf in the lobby - Cut the Scraps is on the bottom shelf all the way on the left!

Taunton offerings cover a lot of non-quilty territory - wood working, gardening, knitting, sewing.

My husband is the gardener guy at our house. So, after a strong recommendation from Jane at the Dana Holcombe House, I signed Dave up for a Fine Gardening subscription. Based on her garden, Judy seemed a good authority on gardening publications!


Renee Neiger and Shawna Mullen, my editors, gathered me up after a quick camera snap, to head to a studio building in an outer area of the spacious Taunton campus.


Burcu Avsar, or Buj for short, our fabulous photographer, met us at the studio. She immediately and expertly began creating an elaborate set-up of lights, tripods, cameras, and computer equipment so we could review each picture as it was taken.


In the meantime, Alison Wilkes, art director, and I sorted through scrap fabrics to pick some favorites to go into instructional photos.


The day flew by. I lost count of how many pictures we took. But we were on schedule and wrapped up right around 4 or 5 pm. The art staff used the rest of the day to sort through the quilts for potential book cover candidates for the next day's photo shoot, which I did not attend. So many choices!

This picture reminds me of my sewing studio when a quilt is in progress. Kinda messy, don't you think?

Seems such a long way off before the next ScrapTherapy book will be in hand! It's targeted for March 2013! I can't wait, how 'bout you?'

Joan


Thursday, March 8, 2012

What's in a Name?


When I finished my first quilt, someone said to me, "Your quilt needs a label."

A label?

See, I have a knitting background. You make a sweater; you put a little tag in the collar when it's done. That's about it. Nothing special. Or, at least, I never did anything special.

Knitted socks, same thing. No label. The whole thing is either stuffed in your shoe, or hidden under your pant legs, invisible.

So I said, "What for?"

"Well, the quilt needs a name, for starters."

Me: "A name?"

In my mind, I'm going back to the sock thing. I mean, for real, do you name your socks? This one's 'Joe,' and that one is 'Sally?'

So, what on earth would you name a quilt?

Then they said "and you should record the important stuff about the quilt, like who made it, the pattern, the date, etc."

Really? (My mind can't let go of the sock concept.)

But, of course, nearly ten years later, I see the wisdom of that advice. How many times have you heard the story of a quilt found at a garage sale or in an old trunk. No idea who made it, for what event, the inspiration.

And naming a quilt, it's almost as much fun as making the project. If you listen to the quilt, it'll tell you its name (no, I haven't gone off my rocker - at least I don't think I have . . . yet!)

A quilt label can be a valuable record. Marked in your handwriting with a permanent pigma marker or with printable fabric and computer software: the name of the quilt, the person who made it, the quilter, the pattern that inspired the design, the occasion it commemorates, where the quilt was made, special washing instructions. A bounty of information for the quilt's journey. It's more important than you might think!

Add some decorative stitching to embellish the label. Make it from scrap fabrics. It can be more than just a record, it's part of the creative expression. Simple or complex.

For this reason, I created a label pattern, called You Name It! that you can use for your finished quilt projects. Secure it to the back of your quilt, placed on point or straight up. The pattern is free, but there's a catch (a little one!)

You have to click over to my newly redesigned website (isn't it pretty?), and fill in your email address in the space on sidebar. That enrolls you in the soon-to-be-launched weekly eNews from Hummingbird Highway. The eNews has a name, too; it'll be called "Good Migrations."

From there you'll receive two emails in response, one to confirm your email is added to the email list and a second one from me with a link to a special page where you can down load your own pattern.

So, what's in a name? Well, You Name It!

Happy stitching,
Joan

Friday, February 10, 2012

The Week in Review

It's Friday.

For those who work a standard 5-day work week, it's time to celebrate.

And reflect.

When I look back at my week, I like to review what I wanted to get done and what I accomplished, and maybe celebrate with a nice dinner along with a tasty glass of wine.

So, this week was no different than any other.


I'm sure it's no surprise to most, I've been working on some new quilt patterns. Scrappy ones. Could there be another book in the works? Hmm. Patience.

Lots of times, a new quilt starts with some scratchy notes in a notebook. Messy stacks of paper on the corner of the desk. And a few sewn samples. Just to see. No commitments yet.

Then it's decision time. A fabric or color theme. Additional fabrics, then the sewing begins. Somewhere in the middle, there always seems to be that twist in the stomach - at least for me. "Who would want this?". . . "Am I crazy?". . . "Does this look good?" And the point in the creative process where I just want to stop. Turn back! Abandon ship! Sometimes I do.

Most of the time, I keep going. "Let's see what this wants to be."

Was this really a good idea?
So, here I am. It's Friday and I'm somewhere in the middle of piecing a new quilt.  This week, I made some 900 (!) small half-square triangle units. Then trimmed them. Yikes!

Trimmed and trimmings
The weekend ahead may hold some interesting developments in the sewing studio . . . Or not. Shall I 'abandon ship?' Or forge ahead?

What did you accomplish this week, and more importantly, will it be red or white with dinner?

Enjoy the weekend!
Joan