
Pinwheel blocks. I love making pinwheel blocks! How
about you? My friend Marcia is addicted to anything pinwheel.
Four half-square triangle units that come together
in the middle. Sew them into rows and watch the secondary patterns develop.
Pinwheel cornerstones add interest to a plain sashing-and-quilt-block layout.
Scrappy, or matchy-matchy. They can even be trimmed down symmetrically to fit a
smaller space. Or add a border to up-size them.
Imagine my surprise when I popped open this box,
nestled comfortably on a bottom shelf in my sewing studio.

'What's this?' I said as I opened the box. It was overflowing
with purple pinwheels - about 150 of them! I had completely forgotten about
these! For a moment, I thought about closing up the box, and putting it right
back where it came from. No one would know, but . . . The GREAT Summer Orphan Block
Challenge seemed the perfect excuse to make something purple, my favorite
stash color. So here goes.
These purple pinwheel blocks were made several
years ago to show how to use a half-square triangle ruler - a ruler that
replaces the 7/8" math to make half-square triangle units from strips. If
you know the finished size of the half-square triangle unit - say 2"
square - just add 1/2" to the measurement, cut strips 2-1/2" and use
a half-square triangle ruler. All that weird math is eliminated.
It works the other way around, too. If you have
strips that are a certain width, you can easily make minimum waste half-square
triangle units from the strips. This is particularly handy for those leftover
strips from pre-cut 2-1/2" strip sets also known as 'jelly rolls' or 'bali
pops,' etc.
So to make the purple pinwheels, I cut lots and
lots of 2-1/2" strips from two different purple prints and started making
half-square triangles. After I made the half-square triangles, I kept
going and made pinwheel blocks. But that's where my motivation must have taken
a nose-dive. The blocks fit nicely into the bin, which fit nicely on that
bottom shelf. How else do these things happen?
Anyway. Before I show you what I'm going to do with
my purple pinwheel blocks, I thought you might like to see how I made the
pinwheels. And while we're at it, let's add another gadget to the GREAT Summer
Orphan Quilt Block Challenge prize package. By the way, a similar
technique is used in the Bloomin' Steps quilt pattern which is
available both as an individual pattern and in the book, ScrapTherapy,Cut the Scraps!
First, cut some strips, 2-1/2" wide. I don't
have any of the purple fabric left, so I'm using some light gray and some
leftover floral print strips.

Next, true up the ends.

Layer the solid and the print, right sides
together. I like to cut two sets or four layers at once.

Then grab a half-square triangle ruler. Several
ruler brands have a similar tool. This one by Creative Grids has a
half-square triangle on one end and a quarter square triangle on the other.
Nice, two tools in one! Yup, one of these is going in the prize package!

This is where each ruler brand might be a little
different, so pay attention to the instructions that come with the ruler. In
this case, the markings on the ruler represent the finished size of the strip
(2") rather than the unfinished size of the strip (2-1/2"). Make sure
the pointy end of the ruler (at the top) extends just a little beyond the top
of the strip - the ruler has a marking at the tip, so you'll know when you have
it just right. Then cut along the right ruler edge along the bias. (Lefties
will do basically the same thing, but from the opposite side)

Next, keeping the ruler right side up, rotate the
ruler clockwise 180˚ to align the bias edge of the ruler with the last cut. Now
cut again along the right, now vertical edge of the ruler.

Keep rotating the ruler 180˚ and keep cutting until
you run out of strip! Keep the layers matched up because they are now ready to
sew.

Sew along the bias cut (also known as the
hypotenuse of the right triangle). I like to put the pointy end in first, to
avoid the end from getting munched into the stitch plate.

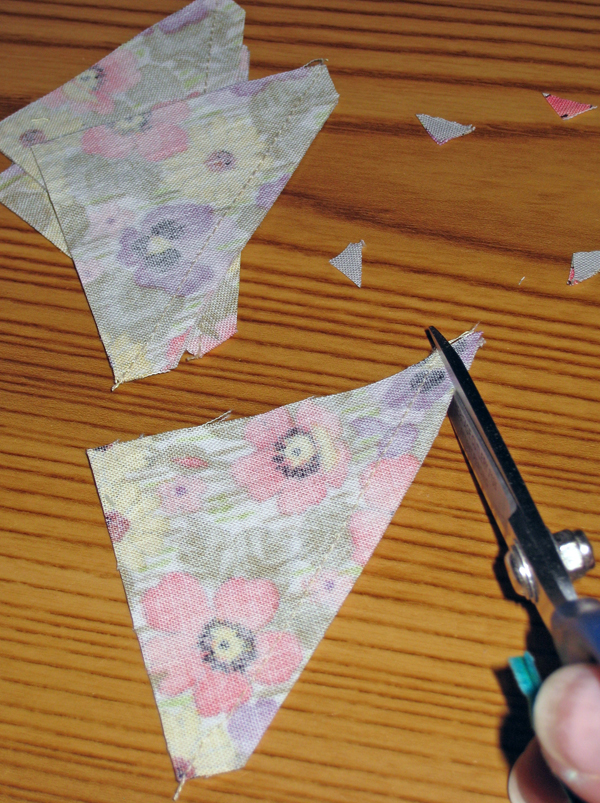
This is an optional step. But I'm a tidy-butt and
like to trim the points.
Press the seam toward the print or the gray, either
one, but stay consistent. In other words, press all the half-square triangle
units the same, toward the print or toward the gray, don't mix them up.

Then sew the upper left to upper right, and lower
left to lower right. If you did the pressing consistently above, then the seams
should nest nicely where they come together in the middle.

Before I sew the long seam, I like to pin
everything in place. Reminder: Me = Tidy Butt!

Then sew the quarter inch seam.

Take out the pins, but before you open the block
for the ah-ha moment, pull out the last three (or so) stitches from the shorter
(vertical) seam. Just those stitches to the right of the longer (horizontal)
seam. Repeat front and back.

Then press the block from the back, opening up the
seam only at that middle
intersection, the rest of the four-patch seams will rotate.

This technique eliminates the extra bulk where a ka-jillion seams come
together.

Ah-ha! Or Ta-Da! Or Ooh-la-la! Pick one! A Pinwheel
block that is 4-1/2" square made from 2-1/2" strips!

Purple Pinwheel Palooza to be continued. . . .
Unless I tuck this project away onto one of those bottom shelves again. You
know how this goes. . . right?
Happy
Stitching!
Joan

PS: Are you working on your entry for the GREATSummer Orphan Block Challenge? The deadline for your entry is September 21,
2012. Still lotsa time left. Barbara and Jay, two quilting BFFs from Cortland,
New York, are having fun and finding treasures in their orphan stash. I can't
wait to see what they do with their orphan blocks!
PSS: Check out the blog entry on CraftStylish. They're talking about us over there. If you read closely, you'll have a big hint on more elements of the prize package. You'd better get sewing, I'm tellin' ya!!
No comments:
Post a Comment