Everyone in Syracuse is all abuzz about AQS Quilt Week coming to town next week. Vendor set-up starts on Monday and the show opens on Wednesday, the 29th. If you're going to be in Syracuse, I highly recommend that you stop by the OnCenter in downtown Syracuse to check out the festivities! Quilts, vendors, classes, the whole sch-bang.
With lots still in the pre-show preparation stage, I thought I'd share some brief happenings here on the 'highway.'
Since I'll be vending at the show, the bins are filling up with all kinds of goodies to take to the OnCenter, the show venue. My booth is 1009. How perfect is that?
What? You don't see the connection? Lately, I've been all about the 9-patch, just take a '9' and throw '100' in front of it. Easy to remember! I like it!
Demos, specially-priced bundles, AND the newest ScrapTherapy pattern, Picasso's Puzzle are the star players at the Hummingbird Highway booth!
Picasso's Puzzle, a hard-not-to-touch fabric cube, features the Middle Scrap Grid interfacing. The patterns are on a truck somewhere between the printer in Minnesota and Syracuse right now as you read this note! I'm told they'll be here in the nick of time for the show! Picasso's Puzzle is SO MUCH FUN to make--in fact my Picasso's Puzzle class at the AQS Show still has openings. Grab an opening and try it for yourself!--(all the prep for the class is done, just show up--of course, you have to enroll first)
If you can't make it to the show, I'll have more details on the pattern packs next time. Ask for the them at your favorite quilt shop, or visit my online cart . . . soon!
I've been busy preparing a couple of new kit samples of the Up One Side table runner. Ridge Rock and Bright Christmas fabric lines from Hoffman California Fabrics are featured in two new kits available for the first time at the booth. And the best part: the fabrics for the quilt top are pre-cut and ready to sew! (Somebody (i.e. me) had better get a binding on that Christmas one!)
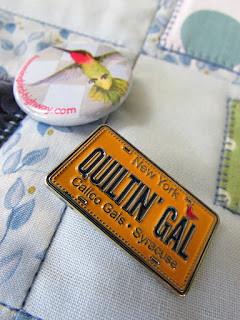
One of the show specials has nothing to do with the show itself! You've heard of the Row by Row Experience? Well, the shop where the whole thing started is right here in Syracuse. I've been working with Janet Lutz, my friend and Calico Gals owner, to put together a really special 'something' for you. For starters, you have to go to the store to pick up their water-themed row pattern, called Drip, Drip, Drop--pattern by yours truly! Bring a friend (or not) and get a great little deal and special present from Janet and me! Here's a hint . . .
And . . . as long as you are in Syracuse, whether you are visiting from far away or from right in town, I want to encourage you to take advantage of a local treasure. The Onondaga Historical Museum has a special exhibit of 20 unbelievable vintage quilts dating to the mid-1800s. Click on the link and scroll down to Patterns in History: Vintage Quilts of Onondaga County for the particulars. I was honored to be involved in helping to select the quilts for the exhibit from their amazing collection. Here's a sample of an exquisite completed crazy quilt that will be included in the exhibit. Aren't these two finely-dressed critters adorable!
While you are at the museum, take a chance to win this vintage-inspired hexagon quilt. It was hand-pieced and hand-quilted here on the Hummingbird Highway by me and donated to the Onondaga Historical Association as a fundraiser. It could be yours if you win the drawing! But to coin a phrase, you gotta be in it to win it!
If you're headed this way, enjoy the Syracuse area . . . more from me online in a couple weeks.
Happy Stitching!
Thursday, July 23, 2015
Thursday, July 9, 2015
Going, going. . .
For the last week or so, my front yard has been 'under construction.' I blame it entirely on the folks over at The Taunton Press. Their book, The Front Yard Idea Book, gave my husband the crazy/inspired idea to install a stone patio in the front of our house! After a few visits to the Phoenix Flower Farm, Dave contracted with Delos and his crew to do the deed. From my sewing room in the front of the house, I've watched as equipment and supplies arrived, lawn disappeared, holes were dug, and stone was laid. . .
. . . It's not done yet, but it's getting close. Some of the plants are staged around the new patio, in their pots, ready for planting. I'll have to show you more pictures when it's all done. Right now, it's in that awkward stage of bland. It's quite a bold move, and such a mess while work is underway. I'm sure our neighbors will be happy when the task is done (stone saws are very noisy and dusty beasts!)
Speaking of messes. I made this tumbling blocks quilt several years ago using Marti Michell's instructions and templates. The quilt is in very good shape considering that is has been passed on to a few different caretakers. Most recently, my brother acquired it while clearing out some of my aunt's things when she was moved to a senior residence. Somewhere along the line this small section of the quilt top interacted with some bleach. A bad combination.
I decided to follow my own advice, and used some suggestions from When Bad Things Happen To Good Quilters. Couldn't find the acrylic templates, but fortunately for me, Marti's book has traceable shapes. I got very lucky and found some purple and blue fabrics, cut the shapes I needed from traced templates, and pieced a very strange-shaped arrangement of four tumbling block shapes to cover the stain.
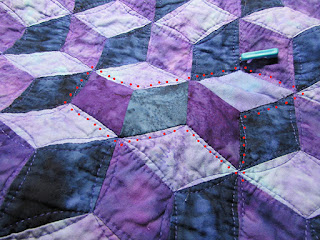
Forgot to take a picture of the shape before I pinned it to the quilt, below. As I pinned, I turned under the seam allowance. See the red outline of the shape?
I used some 60 weight Presencia thread in colors to match to applique the shape exactly over the existing seam lines.
The colors blended so well that I could hardly find the patch for the next step. . .
. . .So I placed a pin nearby to find it again.
Then I found a perfect match for the thread I used for the original quilting. And retraced my quilting lines.
Poof! No more stain.
The full quilt. I circled the pin so you could see where the fix is. Can't see it? . . .
. . . How about a closer look? Yeah, me neither!
When my brother dropped off the quilt to see if it could be fixed, I suspect he really wasn't counting on much.
Showed him! When bad things happen to good quilters . . . good quilters take the challenge!
Happy Stitching!
Joan
Wednesday, July 1, 2015
Challenging Geese
I'm thrilled to be a part of Scrap Quilt Challenge 5! Many thanks to Shannon and her crew at Fabrics N Quilts for inviting me to participate again this year and for organizing a cool way to focus on scraps, completed projects, and summer time all at once! Prizes, too! All you have to do is make scrappy quilts! AND, there's a special deal waiting for you on this post when you make it all the way to the bottom of the tutorial. . . so let's get started!
Since there might be some folks visiting this post who may not already be familiar with me, I'll start with a short self-introduction:
First, place the grid on your ironing surface, fusible side of the interfacing up. Arrange similar color and value 1-1/2" square scraps on the fusible side of the interfacing and fuse with a hot iron when the entire grid is covered with scraps. Refer to the general tutorial to trim the interfacing, place the scraps, and fuse. I'm using a variety of green, blue, and purple scraps in mostly medium values because I just finished a quilt made with green, blue, and purple fabrics. (Funny how that works!)
Next follow the general tutorial to sew six seams, width-wise. (Is that a word? What I mean is sew across the shorter dimension of the rectangle.) Skip the third and sixth seam markings at the red arrows. As a reminder, fold on the dotted lines; sew on the solid lines. Be sure to align the solid lines front to back before you sew, and sew directly on the solid lines
Should look like this from the right side. Notice the seams with the red X aren't sewn.
Now clip the interfacing at EACH the seam intersection at the cross hairs (+) and at the dots (.). Five clips per seam. To make 9-patches, you'd have four clips per seam.
Be sure you clip the seam THROUGH the stitching . . .
. . . so you can nest and oppose the seams. Make pairs of seams that are pressed TOWARD each other on one side and AWAY FROM each other on opposite sides. I call these innies and outies. See the red 'away' arrows and the green 'toward' arrows? Don't forget, fold on the dotted line, sew on the solid line.
Alternate seam direction as you sew each long row.
You should have five lengthwise seams. If you want to make 9-patch blocks, you wouldn't have sewn the third seam (circled in red, view from the back)
Now cut apart the interfacing at the only two remaining unsewn seams. Cut on the dashed lines.
Next, we need to press. I like to 'furl' my seams. Like for 4-patch blocks. But because the interfacing is involved, I need to adjust the pressing technique a wee bit. Instead of having opened mini 4-patches on the back right at the seam intersections, you can make little compressed triangles. Refer to the general tutorial for more specifics.
Once all your seams are pressed, the block base should be 3-1/2x6-1/2". I like to double check the measurement and trim off any spillage caused little variables in scrap placement, sewing blips, or general adjustments.
Repeat until you have the desired number of rectangular bases for your geese. I made 8, all the same, or since they are scrappy, maybe better that I say all are similar. Put those aside for a moment or two.
Cut some 3-1/2" squares. Two squares per block. I chose a solid, high-contrast color. Draw a diagonal line corner to corner on the back.
Align the square on one end of the block and sew on the line. . . . then. . .
. . . turn the block over.
See the existing seam? Leave that alone for now, and draw another line that connects the circled 9-patch seam intersection points.
Sew on the second line, then cut 1/4" away from each line as shown.
Set the little triangle aside for the moment and press the dark square toward the corner. Repeat the process to add a second triangle to the opposite end of the unit. Don't forget to make the little guy, too!
That's a Scrappy Flying Geese unit! I chose to alternate two different colors of flip-and-stitch squares on each end of each unit I made. You can make them both the same fabric, if you prefer.
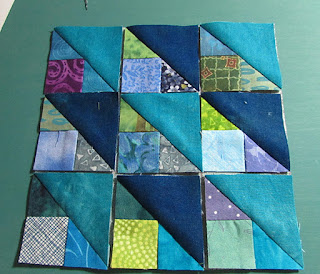
Then I arranged the geese units to create a really scrappy block. Imagine the possibilities with matching squares on each Flying Geese, or pairs of matching squares on alternating units, cool tone scraps/warm tone stitch-and-flip squares, sashing in between geese, geese in a row . . . you get the idea. Endless possibilities. My block measures 12-1/2".
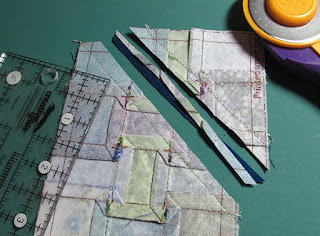
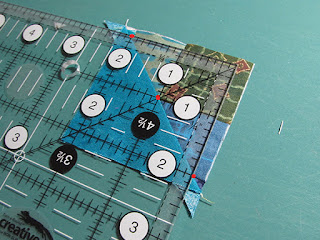
Now, you didn't think I was going to let any of this scrappy goodness go to waste, did you? Retrieve the small corner triangles and press the solid triangle away from the scrappy triangle. Notice the three little red dots. Use a ruler to align the middle dot with the 1" intersecting lines on the ruler, and the two outer dots with the 2" markings at the ruler's edge. All three dots should be right on the pressed diagonal seam. Trim the block on two sides. . .
. . . and flip the block and trim the remaining two sides.
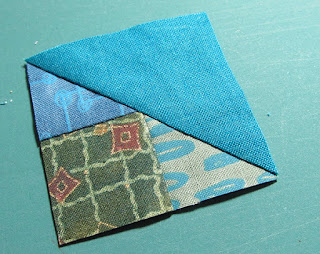
Result: a cute little 2" square pieced half-square triangle unit!
Make a bunch.
Then dig out one 9-patch-worth--or more if you like--of the LITTLE Scrap Grid! And. . .
. . . arrange the 2" pieced units on the Little Scrap Grid . . . like this . . .
. . . or this . . . or any number of different ways. Fuse, sew following the general tutorial for Little Scrap Grid. Then make a Mini Mug Mat, if you like!
Here's another block option incorporating the scrappy Flying geese units as well as four 9-patch blocks for the corners and four 9-patch blocks for the center. This block finishes to 12" square. Also, notice the 5" square Mini Mug Mat made from the leftover Flying Geese corners.
AND, as long as we're considering lots of options. Why not make the base a solid fabric, and use 9-patch blocks made from the Middle Scrap Grid for the outer corners?
Press the seams toward the larger triangle to accommodate the bulky seams on the 9-patch stitch-and-flip unit.
And you'll even have leftovers, just like before!
Since there might be some folks visiting this post who may not already be familiar with me, I'll start with a short self-introduction:
- My name is Joan Ford
- I've written three books, all published by The Taunton Press, ScrapTherapy, Cut the Scraps!, ScrapTherapy, Scraps Plus One!, and When Bad Things Happen to Good Quilters
- My first two books discuss in depth my tried and true method to take my messy scraps, cut them into three square sizes: 2", 3-1/2", and 5" squares. Once I have a ton of cut-up scraps, I choose a theme, select scrap fabrics to match the theme, and then GO--or--should I say, SEW!
Nuff with the formalities!
Last year, my tutorial involved the ScrapTherapy Mini Scrap Grid Interfacing and this cute-as-a-button table runner project.
For my tutorial this year, I thought I'd provide a little twist on the traditional Flying Geese unit--we're on the Hummingbird Highway, after all, and birds are my 'thing.' I'm focusing in on the 3x6" finished size. For my tutorial I'm also using 1-1/2" squares trimmed from my 2" scrap squares from my bin of pre-cut scraps, some Middle Scrap Grid Interfacing, and some fun techniques filled with variety.
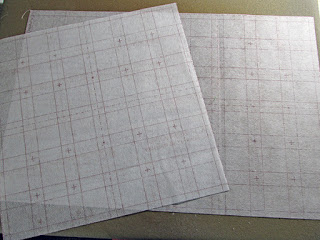
The ScrapTherapy Middle Scrap Grid interfacing is printed by Quiltsmart, and has fusible material on one side, and lines printed on the other. Four different types of lines tell you where to align and fuse scrap squares, clip, sew, and cut. For a more general, detailed tutorial on using the Middle Scrap Grid to make 9-patch blocks, click here. For the Flying Geese, we'll take a few departures from the general tutorial so, don't go too far astray as you follow along step by step.
For starters, the Middle Scrap Grid comes by the panel and there's enough interfacing on one panel to make 24 9-patch blocks. OR, with a few variations in sewing, we can make twelve 3x6" rectangular patches from each panel.
First, place the grid on your ironing surface, fusible side of the interfacing up. Arrange similar color and value 1-1/2" square scraps on the fusible side of the interfacing and fuse with a hot iron when the entire grid is covered with scraps. Refer to the general tutorial to trim the interfacing, place the scraps, and fuse. I'm using a variety of green, blue, and purple scraps in mostly medium values because I just finished a quilt made with green, blue, and purple fabrics. (Funny how that works!)
Next follow the general tutorial to sew six seams, width-wise. (Is that a word? What I mean is sew across the shorter dimension of the rectangle.) Skip the third and sixth seam markings at the red arrows. As a reminder, fold on the dotted lines; sew on the solid lines. Be sure to align the solid lines front to back before you sew, and sew directly on the solid lines
Should look like this from the right side. Notice the seams with the red X aren't sewn.
Now clip the interfacing at EACH the seam intersection at the cross hairs (+) and at the dots (.). Five clips per seam. To make 9-patches, you'd have four clips per seam.
Be sure you clip the seam THROUGH the stitching . . .
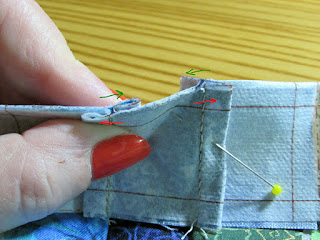
. . . so you can nest and oppose the seams. Make pairs of seams that are pressed TOWARD each other on one side and AWAY FROM each other on opposite sides. I call these innies and outies. See the red 'away' arrows and the green 'toward' arrows? Don't forget, fold on the dotted line, sew on the solid line.
Alternate seam direction as you sew each long row.
You should have five lengthwise seams. If you want to make 9-patch blocks, you wouldn't have sewn the third seam (circled in red, view from the back)
Now cut apart the interfacing at the only two remaining unsewn seams. Cut on the dashed lines.
Next, we need to press. I like to 'furl' my seams. Like for 4-patch blocks. But because the interfacing is involved, I need to adjust the pressing technique a wee bit. Instead of having opened mini 4-patches on the back right at the seam intersections, you can make little compressed triangles. Refer to the general tutorial for more specifics.
Once all your seams are pressed, the block base should be 3-1/2x6-1/2". I like to double check the measurement and trim off any spillage caused little variables in scrap placement, sewing blips, or general adjustments.
Repeat until you have the desired number of rectangular bases for your geese. I made 8, all the same, or since they are scrappy, maybe better that I say all are similar. Put those aside for a moment or two.
Cut some 3-1/2" squares. Two squares per block. I chose a solid, high-contrast color. Draw a diagonal line corner to corner on the back.
Align the square on one end of the block and sew on the line. . . . then. . .
. . . turn the block over.
See the existing seam? Leave that alone for now, and draw another line that connects the circled 9-patch seam intersection points.
Sew on the second line, then cut 1/4" away from each line as shown.
Set the little triangle aside for the moment and press the dark square toward the corner. Repeat the process to add a second triangle to the opposite end of the unit. Don't forget to make the little guy, too!
That's a Scrappy Flying Geese unit! I chose to alternate two different colors of flip-and-stitch squares on each end of each unit I made. You can make them both the same fabric, if you prefer.
Then I arranged the geese units to create a really scrappy block. Imagine the possibilities with matching squares on each Flying Geese, or pairs of matching squares on alternating units, cool tone scraps/warm tone stitch-and-flip squares, sashing in between geese, geese in a row . . . you get the idea. Endless possibilities. My block measures 12-1/2".
Now, you didn't think I was going to let any of this scrappy goodness go to waste, did you? Retrieve the small corner triangles and press the solid triangle away from the scrappy triangle. Notice the three little red dots. Use a ruler to align the middle dot with the 1" intersecting lines on the ruler, and the two outer dots with the 2" markings at the ruler's edge. All three dots should be right on the pressed diagonal seam. Trim the block on two sides. . .
. . . and flip the block and trim the remaining two sides.
Result: a cute little 2" square pieced half-square triangle unit!
Make a bunch.
Then dig out one 9-patch-worth--or more if you like--of the LITTLE Scrap Grid! And. . .
. . . arrange the 2" pieced units on the Little Scrap Grid . . . like this . . .
. . . or this . . . or any number of different ways. Fuse, sew following the general tutorial for Little Scrap Grid. Then make a Mini Mug Mat, if you like!
Here's another block option incorporating the scrappy Flying geese units as well as four 9-patch blocks for the corners and four 9-patch blocks for the center. This block finishes to 12" square. Also, notice the 5" square Mini Mug Mat made from the leftover Flying Geese corners.
AND, as long as we're considering lots of options. Why not make the base a solid fabric, and use 9-patch blocks made from the Middle Scrap Grid for the outer corners?
Press the seams toward the larger triangle to accommodate the bulky seams on the 9-patch stitch-and-flip unit.
And you'll even have leftovers, just like before!
I hope you've been inspired! Of course, you don't need to have the Middle or Little Scrap Grid to make your wildly scrappy Flying Geese units, but I have to admit that I'm addicted to the stuff.
Save 25% When You Purchase Your Scrap Quilt Challenge 9-Patch Bundle by July 31st!
I'd love for you to try it, too! Therefore, I'm offering a little incentive only during this first month of Scrap Quilt Challenge 5, with a special bundle for you.
CLICK HERE to purchase the Scrap Quilt Challenge 9-Patch Bundle which includes four panels of ScrapTherapy Middle Scrap Grid Interfacing (enough to make 96 Scrappy Flying Geese, or twice that many 9-patch blocks), one panel of ScrapTherapy Little Scrap Grid Interfacing (enough to make 12 scrappy leftover Mini Mug Mat tops), plus a package of Mini Mug Mat Just the Batting (six pieces of 5" pre-cut double sided fusible foam batting) for the mug mats. The regular price for all the stuff in this special bundle is $50. Buy it this month for $37, and save 25%. The special price is good between now and July 31st, 2015.
Have a fantastic, scrappy summer, and
Happy Stitching!
Joan
Subscribe to:
Posts (Atom)


