Thursday, August 30, 2012

Purple Pinwheel Palooza, Part Two


I mentioned last week that I 'unearthed' a little surprise stash of purple pinwheel blocks - about 150 of them! - when I was packing for a quilt retreat not too long ago. I remembered making the blocks, in fact I walked you through how I used a specialty ruler to make the half-square triangle ruler from strips last week. You can read more about it here, if you'd like a refresher.

Anyway, even though I remembered the blocks, I just forgot that I never used them. And since purple is one of those fabric colors I can't pass up when I'm in the local quilt shop, it would be a shame for these blocks to stay stowed in a box on a bottom shelf. So, I decided these blocks wanted to become a quilt.

So I found some purple coordinates in my stash. (I knew I bought those fabrics for a reason!) And cut them up in to 4-1/2" squares, same size as the pinwheel blocks. Three different fabrics, a medium/bold purple, a light lavender/purple, and an off-white. Then laid them out on a table, arranging the fabric squares and the pinwheel blocks alternately in rounds. Lightest fabric squares in the middle, darker fabrics in the outer round. And the medium stuff in the middle. And on point.
Then I stacked up my blocks by row and sewed them into rows.
To make the setting triangles, I went back to the Small Diagonal Set Triangle Ruler from Marti Michell (it's already in the prize package - Yay!). Picked out a dark purple from the stash. And cut strips for the sides, and cut the side setting triangles. I made my strips large enough so the outer blocks would 'float.' I lined up he ruler and cut one side . . .
 . . . flipped the ruler, and cut the other side. Making sure to align the bottom line on the ruler with the edge of the fabric and the top blunt point with the bias cut edge of the fabric.
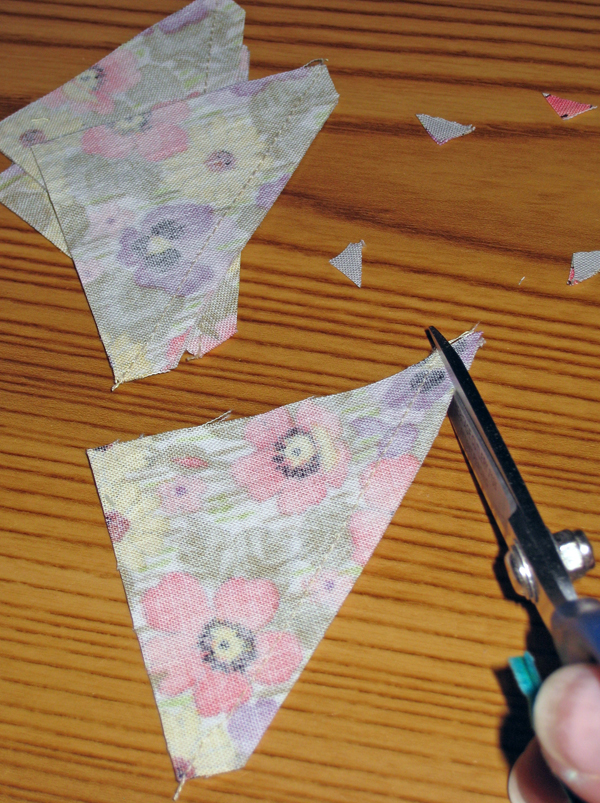
I used the tool to blunt the corners so they piece together perfectly.
Then I cut my corner triangles from the larger strip. (Yes, it's the same dark purple fabric, the color got a little strange for these next couple photos - operator error (me), I'm sure.)
And blunted the corners.
With the blocks and fabric squares sewn, I just need to lay out the pieced strips and add the triangles to the end of each row.
Then sew the rows together. It looks like the setting triangles don't line up very well. In fact, they line up perfectly once they are sewn to the rows.
What about a border? Absolutely! Let's do that next time.
Purple Pinwheel Palooza to be continued!

The GREAT Summer Orphan Block Challenge

For those of you following the GREAT Summer Orphan Block Challenge, Labor Day = the End of Summer, BUT there is still time to enter the challenge! The deadline (September 21st, 2012, 11:59pm) is getting closer. Find an orphan block or several in your stash and turn it into a project. Send before and after pictures and tell the story of your project and you could be a grand prize winner! Easy enough, right?!

Speaking of Prizes – The Taunton Press Weighs In!

The prize package for the GREAT Summer Orphan Block Challenge continues to grow. The Taunton Press published my first book, ScrapTherapy, Cut the Scraps! back in March 2011. And in April 2013, they'll be releasing my second book, ScrapTherapy, Scraps Plus One!
When Taunton heard about the GREAT Summer Orphan Block Challenge, they wanted to play, too. So, Taunton is adding some wonderful new titles to the grand prize package. And such variety. There's something for everyone here.
First in Kaffe Quilts Again, Kaffe Fassett has taken twenty of his favorite quilts and updated them with new fabrics. The beautiful photography of the quilts in rural Bulgaria makes this sheer eye-candy for any quilter!
Next, we're adding the Kitchen and Bath Planning Guide. While you're busy at the sewing machine, you can dream about your next bathroom and kitchen upgrade with some inspiration from Fine Homebuilding. What a treat! This magazine makes me want to call my plumber and grab a hammer!
Quilters love to cook. And quick and delicious seems to be the way to go. Quick Fix Meals by Robin Miller is chock full of simple, yummy recipes - 200 of them! - to give you energy to sew. If you win the grand prize, just tell me what time, and I'll plan to pop in for dinner!
More prizes from The Taunton Press will be announced next time!
Happy Stitching!
Joan

Thursday, August 23, 2012

Purple Pinwheel Palooza Part One


Pinwheel blocks. I love making pinwheel blocks! How about you? My friend Marcia is addicted to anything pinwheel.

Four half-square triangle units that come together in the middle. Sew them into rows and watch the secondary patterns develop. Pinwheel cornerstones add interest to a plain sashing-and-quilt-block layout. Scrappy, or matchy-matchy. They can even be trimmed down symmetrically to fit a smaller space. Or add a border to up-size them.

Imagine my surprise when I popped open this box, nestled comfortably on a bottom shelf in my sewing studio.

'What's this?' I said as I opened the box. It was overflowing with purple pinwheels - about 150 of them! I had completely forgotten about these! For a moment, I thought about closing up the box, and putting it right back where it came from. No one would know, but . . . The GREAT Summer Orphan Block Challenge seemed the perfect excuse to make something purple, my favorite stash color. So here goes.

These purple pinwheel blocks were made several years ago to show how to use a half-square triangle ruler - a ruler that replaces the 7/8" math to make half-square triangle units from strips. If you know the finished size of the half-square triangle unit - say 2" square - just add 1/2" to the measurement, cut strips 2-1/2" and use a half-square triangle ruler. All that weird math is eliminated.

It works the other way around, too. If you have strips that are a certain width, you can easily make minimum waste half-square triangle units from the strips. This is particularly handy for those leftover strips from pre-cut 2-1/2" strip sets also known as 'jelly rolls' or 'bali pops,' etc.

So to make the purple pinwheels, I cut lots and lots of 2-1/2" strips from two different purple prints and started making half-square triangles. After I made the half-square triangles, I kept going and made pinwheel blocks. But that's where my motivation must have taken a nose-dive. The blocks fit nicely into the bin, which fit nicely on that bottom shelf. How else do these things happen?


Anyway. Before I show you what I'm going to do with my purple pinwheel blocks, I thought you might like to see how I made the pinwheels. And while we're at it, let's add another gadget to the GREAT Summer Orphan Quilt Block Challenge prize package. By the way, a similar technique is used in the Bloomin' Steps quilt pattern which is available both as an individual pattern and in the book, ScrapTherapy,Cut the Scraps!

First, cut some strips, 2-1/2" wide. I don't have any of the purple fabric left, so I'm using some light gray and some leftover floral print strips.

Next, true up the ends.

Layer the solid and the print, right sides together. I like to cut two sets or four layers at once.

Then grab a half-square triangle ruler. Several ruler brands have a similar tool. This one by Creative Grids has a half-square triangle on one end and a quarter square triangle on the other. Nice, two tools in one! Yup, one of these is going in the prize package!

This is where each ruler brand might be a little different, so pay attention to the instructions that come with the ruler. In this case, the markings on the ruler represent the finished size of the strip (2") rather than the unfinished size of the strip (2-1/2"). Make sure the pointy end of the ruler (at the top) extends just a little beyond the top of the strip - the ruler has a marking at the tip, so you'll know when you have it just right. Then cut along the right ruler edge along the bias. (Lefties will do basically the same thing, but from the opposite side)

Next, keeping the ruler right side up, rotate the ruler clockwise 180˚ to align the bias edge of the ruler with the last cut. Now cut again along the right, now vertical edge of the ruler.

Keep rotating the ruler 180˚ and keep cutting until you run out of strip! Keep the layers matched up because they are now ready to sew.

Sew along the bias cut (also known as the hypotenuse of the right triangle). I like to put the pointy end in first, to avoid the end from getting munched into the stitch plate.

This is an optional step. But I'm a tidy-butt and like to trim the points.

Press the seam toward the print or the gray, either one, but stay consistent. In other words, press all the half-square triangle units the same, toward the print or toward the gray, don't mix them up.

Then sew the upper left to upper right, and lower left to lower right. If you did the pressing consistently above, then the seams should nest nicely where they come together in the middle.

Before I sew the long seam, I like to pin everything in place. Reminder: Me = Tidy Butt!

Then sew the quarter inch seam.

Take out the pins, but before you open the block for the ah-ha moment, pull out the last three (or so) stitches from the shorter (vertical) seam. Just those stitches to the right of the longer (horizontal) seam. Repeat front and back.

Then press the block from the back, opening up the seam only at that middle intersection, the rest of the four-patch seams will rotate. 
 
This technique eliminates the extra bulk where a ka-jillion seams come together.

Ah-ha! Or Ta-Da! Or Ooh-la-la! Pick one! A Pinwheel block that is 4-1/2" square made from 2-1/2" strips!

Purple Pinwheel Palooza to be continued. . . . Unless I tuck this project away onto one of those bottom shelves again. You know how this goes. . . right?

Happy Stitching!

Joan
PS: Are you working on your entry for the GREATSummer Orphan Block Challenge? The deadline for your entry is September 21, 2012. Still lotsa time left. Barbara and Jay, two quilting BFFs from Cortland, New York, are having fun and finding treasures in their orphan stash. I can't wait to see what they do with their orphan blocks!

PSS: Check out the blog entry on CraftStylish. They're talking about us over there. If you read closely, you'll have a big hint on more elements of the prize package. You'd better get sewing, I'm tellin' ya!!

Thursday, August 16, 2012

Sun Kissed Topper

August. 

Middle of August.

Does this make you nervous? It does me! Seems like I still have so many summer things to do, and not enough summer left to do them.

So I guess, I should quit crying, and start doing, eh?

Speaking your summer to-do list, have you started working on your entry for The GREAT Summer Orphan Block Challenge yet? If not, you'd better get crackin'. There is still plenty of time, the deadline for entries is September 21, 2012. But there's less time now than there was this time last week, and there will be less time next week than there is this week. (Do you understand why these things make me so nervous?)

Here’s a little something I pulled out of my stash this week to get your thoughts humming.

I may have mentioned last week that I really like citrus colors. And when you have fabrics you really love, you don't want to let a single thread of it go to waste.

That's what happened when I made a quilt a couple of years ago. I think these prints might have been from a Moda line of fabrics, bright and cheery, and very citrus-y. As I recall, I did a mitered border on that quilt. Usually when I miter the corner seams on a border, I sew multiple border strips together first, then attach them to the quilt. For this particular quilt and these leftover border pieces, I stored the leftover strips in a 'safe' place, and promptly forgot about them.

Until The GREAT Summer Orphan BlockChallenge got me digging into spots in my sewing studio that I forgot that I had. And unearthed those strips again.

Not enough to make another border, but what can this become?

The sewn border strips were 8-1/2" wide, so I had enough strip-segments to cross-cut into three 8-1/2" "blocks." A few extra strips were sewn together, just enough to make a fourth block. And a little 18” square table topper appeared - “Sun Kissed Topper”

To the blocks, I added pieced sashing strips from a little bit of cream and green solid fabrics to coordinate, and I fussy-cut one last little bit for the center of the center piece.

I was tempted to arrange the newly-created blocks in a rotating fashion - like a rail fence layout, with the pieced sashing strips in-between. But by placing the blocks into their current position, the table topper has an illusion of being a little bit longer than it is wide. Plus, I think it looks rather playful this way, don't you?

To keep things simple, I did a pillow-case technique to encase the raw edges by layering the batting, backing right side up, (a scrap of lime-like green print leftover in my stash, about 20" square), and the top, right side down.

A word about the batting I used. I confess: I am addicted to wool batting! My favorite is Hobbs Washable Wool. It's light weight, quilts beautifully by hand or by machine, has a really nice hand, doesn't remember folds like cotton does, and it's machine washable! So I asked my buddies at Hobbs Bonded Fibers if they would throw in some batting to our Orphan prize package, and they said, yes! WooHoo! Add a Throw size (60" x 60") wool batting to the Grand Prize Package for the lucky Orphan Block Challenge winner!


Like we did for the Tootie Fruitie Table Runner last week, sew 1/4" seam around the edge of the top, leaving a 6" opening for turning.

Trim the batting and backing even with the quilt top.

Don't forget to save the extra batting scraps to make pin cushions!
 
Pin around the edges and the the opening closed with a decorative edge stitch around the entire quilt. Then quilt the project.

Then, quilt the center!

A puff of steam from a hot iron to settle the wool batting into place, and . . . All done! Another 'orphan' put to bed, so to speak!

All this citrus stuff has made me thirsty! Time to relax with a nice tall glass of fresh lemonade . . . and enjoy August with some stitching, of course.


Happy Stitching!

Thursday, August 9, 2012

Tootie Fruitie Citrus Table Runner


When I was cleaning out a section of my sewing studio last week, I unearthed a pile of citrus-y scrap fabrics, a bright and fun citrus focal print, and ten 5-1/2" quilt blocks in lime greens, lemon yellows, and juicy oranges. Hey, at least when I abandon a project, I'm organized about it! They were perfect to create another Orphan Block project, part of the GREAT Summer Orphan Block Challenge.


The blocks were made for a sampler quilt that never really 'floated my boat.' I made a few blocks, got frustrated, bored, or 'whatever' and moved on. Sound familiar?

The new-found blocks are really pretty. And I love the citrus theme I selected. With 10 completed blocks, I wanted to even up the numbers to twelve, so I could make two place mats. I made two more blocks, six blocks for each place mat. Pulled out some black fabric to make a skinny sashing and all of the sudden, these blocks wanted to be a table runner, not place mats. So I listened to them.

Tootie Fruitie Table Runner 

(14" x 36")
To make the table runner, I used about 1/4 yard of solid black fabric. I chose black because I wanted the bright citrus colors to 'pop!' And 2/3-3/4 yard of a focus print for the borders and backing. Plus the 12 orphan blocks that will finish to 5" square. I cut a 16" strip from my focus print for the backing. Then I used three 2" strips for the borders.

In addition I needed a piece of batting, about 18" x 40". I used Inn Control, by Innovative Craft Products. It's stable. It's fluffy. It washes beautifully, and most importantly for a runner, it lays flat when all is said and done. This stuff is great for tableware, wall-hangings, and bags.

If you want to make this project, you may need to adjust the fabric quantities a little bit if your orphans are a different size. A 5" finished block size isn't very common, so this project is easily up-sized or down-sized to suit your orphans. Or replace the blocks with several different prints from your stash, cut to 5-1/2" square.

After arranging the blocks, sew a 1" x 5-1/2" black strip between the blocks in the 2-block rows. Then add a 1" x 11" black strip in between rows. As you add one row to the next, pin carefully and watch the alignment from row to row so the narrow sashing line that runs down the center of the length of the runner stays straight. With such high contrast colors, a little wobble here and there might be noticeable, if that kind of thing bothers you.

When sewing narrow sashing or border strips, measure strip lengths carefully, use lots of pins, and sew with accuracy to keep the narrow strips from distorting from variable seam allowances.
Add 1" x 5-1/2" black sashing strips between blocks in each two-block row, then add 1 " x 11" black sashing strips between rows. Sew and press seams toward sashing. Add 1" x 33" side borders, and 1" x 12" end borders.

Most of my rulers are about 12 - 14" long, so getting precise measurements for the longer borders can be tricky. I prefer not to measure, but to use the quilt, or in this case, the table runner to do all the measuring, math, and numbers. First, to measure the side borders to the correct width, I fold the runner in half, right side together, wrong sides together, either way, doesn't matter.

Then I fold the border fabric, cut to size, 2" wide in this case, and lay it on the folded quilt top, so folds are aligned, and the edge of the border strip aligns pretty well with one of the seam lines. To cut two borders at a time, I put the second border strip in place, too. Line up a ruler with the end of the quilt top, and cut the border. Perfect! No math!

From there I open up the quilt, pin each end of the border in place, and ease the center of the border onto the edge of the quilt and pin some more. I do a lot of pinning!

Ta da!
The top is done


Since it's summer, and I like the get-it-done-kind-of-project this time of year, I chose to do a pillow-case finish, rather than a traditional sandwich, quilt, and bind. As a bonus, no extra binding fabric is needed.

Layer the Inn Control batting, the backing fabric, right side up, and the quilt top, right side down on your work surface. Smooth everything out nice and flat!

Then pin around the perimeter. Next you will sew a 1/4" seam along the quilt top edge, leaving an 8" opening to turn everything right side out later. When I do this kind of finish, I tend to zip right along, sometimes forgetting to leave an opening. (I'm sure that has never happened to you!). Any way, for a little insurance, I like to put two pins close together at the point where I want to stop sewing. The pins remind me to stop being so speedy!

At the beginning and at the end of the round, I take a few reverse stitches to keep the stitches from popping open when turning. I'm using a dual feed foot, but you may prefer using a walking foot to keep stitches even through several layers.

Trim 1/4" away from the seam

Be sure to trim off the pointy ends to reduce bulk. Be careful not to trim through the seam.

Turn the whole kit and kabootle right side out.

Now you've got a potential mess on your hands. To make sure everything ends up nice and flat, hand press the layers together, smoothing out any bulk or bubbles. At the turned edge, squish the edges like a toothpaste tube, to align and compress the edge, then pin around the  perimeter as you squish, maybe every 2" or so.

I prefer to avoid hand sewing the closure, as some might suggest. Instead, at the opening, turn the seam allowances under, including the batting thickness, and hyper-pin--maybe one pin for each 3/4" or 1" just at the opening.

Step back and take a look at the opening section. Make sure the edge forms a straight line. You don't want the opening section to tuck in too much seam allowance or it'll look like someone took a bite out of your runner!

At this point, I like to pin baste the quilt center a little bit too, so everything stays stable!
Pinned edge. Pin-basted center

Pull out an open-toe foot (or your walking foot), select one of the decorative stitches on your machine and edge stitch all the way around.
A decorative stitch along the edge for a nice finish


Pretty! The decorative edge stitch serves three purposes. 1) it closes the opening without having to do hand sewing. 2) It compresses the extra bulk created by the fabric and batting seam. 3) it's pretty! And it gives you and excuse to use something other than a quarter inch foot and a straight stitch!

Add a little quilting in the center. Then press the runner flat.
Tootie Fruitie Table Runner
Finally, if your quilting makes the runner ripple a little, don't despair! That's why I liked using the Inn Control batting for this project. A little bit of steam pressing and the runner becomes perfectly flat. Since the batting is polyester, it'll stay nice after many washes. Want some? . . . Win some! A package of 18x 58" Inn Control is now in the prize package for the GREAT Summer Orphan Block Challenge! Or you can purchase it now in the Hummingbird Highway cart. This is the same stuff that Aunties Two uses in many of their bag samples, Exact same stuff!


Now, orange you so glad you read this! (nyuk-nyuk)

Happy Stitching!
Joan