My message to you this week is brief but sincere.
I hope all your holiday preparations are well underway, and that you enjoy the holiday season to the fullest.
As 2015 comes to a close, I thank you from the bottom of my heart for sharing a little of yourself with me and allowing me to share bits and pieces from the weekly activities in and around my quilting studio.
2015 has been a fun ride. I hope you've enjoyed the things that I've shared here each week. I can't wait to see what 2016 has in store for us! Quilting cruises and retreats, travel and shows, finished quilts, new projects, and fun adventures. Bring it on!
In the meantime, I'm taking next week off to play with fabric and thread in the studio, and relax with family and friends. Thank you sincerely for joining me in my weekly journey during 2015. I'll chat with you again in the new year!
Merry Christmas!
Happy New Year!
. . . and Happy Stitching!
(in the photo: Knee Hugger Elves, pattern by Heidi Boyd)
Thursday, December 24, 2015
Thursday, December 17, 2015
Last Minute LuLu
 This Christmas season, I feel like such a Last Minute LuLu! How about you? Is all your shopping done? Cookies baked and ready for festive holiday trays? Lights on the tree? Shopping complete? All wrapped up with shiny paper and bows?
Me, not so much. BUT, I have a good excuse! I could just about bust keeping this a secret until now. I have a new coloring book in the works!
Here's the thing, the coloring book is SO new, and came together SO quickly, that it's not available anywhere just yet! It's on deck for arrival sometime in January or early February.
Do you want to be the first to receive your very own copy?
To celebrate the new coloring book and to help you finish your last minute quilty shopping, here is a special offer just for you--and your Santa shopper (feel free to share this post with your guy in red so he knows just what to do!)
A LAST MINUTE HOLIDAY BONUS:
Spend $30 with the Hummingbird Highway
Add the NEW Scrappy Quilts Coloring Book to your cart. (For a sub-total of at least $39.95)
Enter the Coupon Code LastMinuteLulu (no spaces) and be among the first to get the Coloring Book . . . for FREE!
Offer ends Monday, December 21, 2015 at midnight (east coast time).
Your order will ship no later than Tuesday, December 22 (assuming everything in your order is in stock).
The Scrappy Quilts Coloring Book will ship as soon as it's available (expected January 2016)
Happy holiday preparations!
joan
Thursday, December 10, 2015
'Like a Light Bulb'
Every year, I stuff my holiday greeting cards with a simple, hand-made ornament. With the holiday closing in, and just enough time to get the cards in the mail, this week I've been a busy-bee with the needle and thread.
First, the Ho Ho Sew Sewing Machine Ornament from Betz White. It's a pdf download, so if you have some felt and a few other items in your craft stash, you can start (and finish) right away!
Here's my version! Betz's ornament has a little Santa hat in progress, I took a slight detour from her pattern and added a little quilt in progress instead of the hat. I never was one for garment sewing!
Fair warning, these are really fun to make and so addicting. How do I know? Well, let's just say I have a little production line going. Some of my sewing soul mates just MIGHT find one of these on their trees very soon! Aren't they cute, cute, cute??
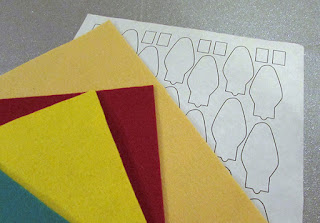
Moving on. the sewing machines are great, but I'd have a tough time jamming them into my holiday greeting cards. And not everyone on my list is a sewing soul-sister. Therefore, for my holiday card ornaments this year, I took my inspiration from holiday light bulbs. . . I used some brightly colored felt, thread, and a template. Here's the template, enough for twelve ornaments on each sheet (just in case you want to make some, too!).
I printed the template onto freezer paper, rough cut apart pairs of ornaments and bases and fused the shapes onto the felt. Then cut around the shapes.
Remove the paper, and add some embroidery details. I used metallic embroidery thread to add stem stitches and a couple of lazy daisy loops to mimic the old-fashioned filament inside the bulb. Regular perl cotton works just fine too.
Embroider two bulbs, and grab two bases cut from gray light-colored felt.
Use a glue stick to hold the pieces together. Sandwich two bulbs back to back, and two bases.
With coordinating thread, sew a running stitch or blanket stitch around the edge.
Add a loop for hanging. . .
And there you have it!
Find a tree branch to decorate, and you're good to go! (Ho, Ho, Ho!)
Now, I just have to make the time to get my cards addressed and in the mail. . . And then there are cookies to bake, shopping to finish, gifts to wrap and ship, . . .
Rut-roh. I'd better get moving! How's your holiday to-do list coming along?
Happy Stitching!
Joan
Thursday, December 3, 2015
Threading the Needle
Sometimes just one little tip and make all the difference!
This week, I've been working on finishing up some projects that have been hanging around for a while. UFOs (UnFinished Objects), PHDs (Projects Half Done), WIPs (Work In Progress).
I've been working on this project all year. It's part of a monthly club I attend when I'm in town, mostly for the social aspect. The pattern, Timeless Tradition by Bits 'n Pieces) is for a whole quilt. I scaled it down quite a bit to make a table runner.
To keep the project portable, I opted to hand applique and hand quilt the project.
And this little project isn't quite complete yet. A week ago, it was wadded up in a basket marked and ready for quilting. The embroidered center is a mixture of a couple of patterns from Bird Brain Designs. The center was then appliqued to the base, sandwiched, then basted. The quilting is complete. Now I'm in the process of adding embroidery embellishments to be topped off with some beadwork.
Then this week, the folks at Threads Magazine sent along this two-minute video packed with some really helpful tips. I'm happy to say I learned this technique when I first started hand-sewing, but the video is a good reminder. And I love the tip about the lip balm . . .
And the tip is so well-timed. I know a few people *a-hem* who might be doing some last minute sewing as the Christmas holiday gets closer and closer. You just don't need your thread fighting you as you place those last stitches to secure the binding around the perimeter of your quilted masterpiece!
Happy Stitching!
joan
Subscribe to:
Comments (Atom)


