Over the long holiday weekend, I did a little picking up in and around the studio. I pulled out about 4-5 yards of 'textured' fabric that I purchased years ago. I don't know what I was thinking when I bought this. It really isn't a good fit for quilting because the weave is quite loose. As I was digging around and tidying up, I got to thinking about a little washcloth project I made years ago from some pattern notes from the local quilt shop, and thought I'd take my 'lemon' textured fabric and turn it into 'lemonade.'
The original project called for osnaburg, also known as prairie cloth. Look for it at the local quilt shop, or at the big box stores like Michaels or Joanns, or you can find it here (affiliate link), if you're stuck - it can be hard to find. As a test, I substituted my loose weave textured fabric for the osnaburg.
Here's what I did. Lotsa photos, very few words. You can make one of these in an hour or two. Great teacher or Father's Day gift paired with a bar of fragrant soap.
Here goes:
You need 2/3 yard of the osnaburg (or loose weave textured cloth) for one wash cloth. Plus some scrap binding and a larger 12" scrap square.
Cut the osnaburg into eight 10" squares (roughly - precision is not necessary)
Stack the eight squares of osnaburg with the 12" fabric square in the center of the pile like a sandwich. Four layers of osnaburg, one 12" fabric square, and four layers of Osnaburg.
Draw a diagonal line corner to corner on the top osnaburg layer.
Then pin the be-jeebers out of it to hold the layers together.
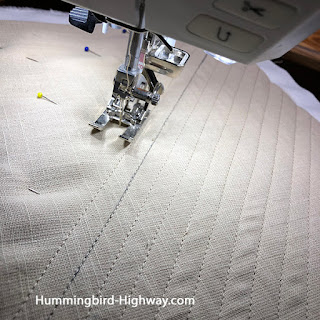
Using a walking or dual feed foot and sew on the line . . .
Using the side of the foot as a guide, topstitch about 1/4" to 3/8" away from the center line, then each stitching line, so you end up with diagonal stitching lines covering your fabric layers. You don't have to sew all the way to the edge of the 12" scrap fabric, just across the osnaburg layers.
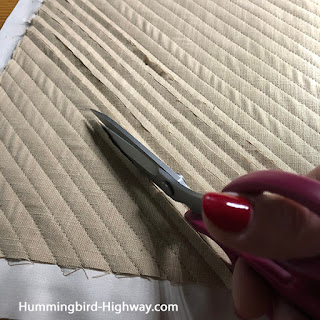
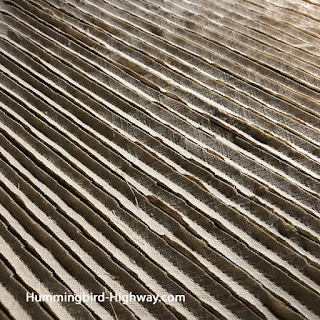
Be careful not to cut the 12" scrap square layer, cut ONLY the osnaburg layers with scissors between each set of seams. Do this on both sides.
You can buy a chenille cutting tool, but the scissors work fine if you're only making a small handful of these.
Center and trim to 9" square.
Then round the corners, roughly. Nothing fancy or measured, just simply rounded (it's a wash cloth). You really don't have to do this step, but for a wash cloth, I think a rounded edge is nice.
Dig into your collection of scrap binding strips (I know you save all those last bits of binding, I just know it.)
Pull out one piece about 6" long and trim 3/4" away from the fold.
Pull out a second binding strip that is about 20-30" long.
Make a hanger from the 6" binding strip by opening the fold, and folding each side to the center, press, and refold. . .then top stitch along each long edge.
Position the hanger on one corner of the trimmed wash cloth and pin in place
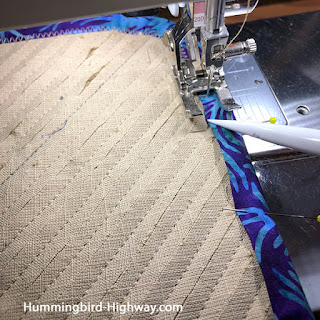
Pin the longer binding strip, raw edges aligned around the perimeter of the wash cloth, just like you would with a quilt.
A little problem here, with those rounded corners, a bias binding would work much better than straight of grain stuff. And I do occasionally have extra bias binding around. However, the larder is empty of bias binding scraps at this moment, but there is plenty of straight grain binding scraps. No, I'm not going to cut perfectly good fabric to make bias binding. It's a wash cloth. A little extra crumple around the corners won't hurt anyone. And if I need a stiletto to ease the binding into place, so be it!
Turn the folded edge to the back and zig zag along the binding edge to secure it.
I know it doesn't look like much at this point, but toss it in the washing machine then the dryer where the magic happens. It comes out soft and puffy, and ready to use or gift.
Top of the photo - washed, made with osnaburg. Bottom of the photo made with the 'textured fabric,' not washed yet
This is the second wash cloth I made with this fabric over the weekend, and I didn't have time to wash it before writing this post. The first was a true trial run to see if this non-osnaburg fabric worked similarly. It was pretty close, the osnaburg is a little fluffier and softer after washing, but this version is definitely useable. It's actually hanging in the shower in between uses right now. Dave put it into action right away. (I didn't think you'd want to see a 'dirty' wash cloth picture, so you kinda need to trust me on this.)
To use up the rest of that textured fabric, I cut it up and stacked it along with some 12" scrap fabric squares (prints work just fine). The stack is waiting for my next sewing session.
I'll go digging into my binding scraps when I'm ready for it.
A perfect way to turn lemons into lemonade! No dirty birds around here! What is your favorite lemon/lemonade project idea?
Happy Stitching!
Joan
Thursday, May 30, 2019
Thursday, May 23, 2019
Inquiring Minds
I received an email from Debbie earlier this week. She said, "Have you ever considered doing a biscornu shaped pin cushion using fabric?" If you've followed this blog for any length of time then you have probably surmised that I'm a bit addicted to these wonky, stuffed pin cushions, typically made from some variation of charted- or counted-thread stitching on light canvas or linen.
But what about fabric?
So this week, I reached into one of my ScrapTherapy bins, pulled out some 3-1/2" scrap squares and decided to give it a go. A quick, more-pictures-than-words summary of the steps I took follows:
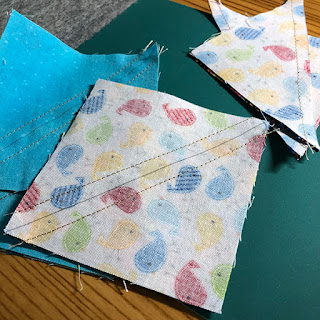
First I pulled out two each of four different 3-1/2" square scrap prints from my ScrapTherapy bins and made half-square triangles. (You know the drill, draw a corner-to-corner diagonal line on the back of half the squares, place two right sides together, sew 1/4" from each side of the line, cut apart, press and trim to 3" square.)
I arranged the half-square triangles into to 'broken dishes' blocks. Sewed and pressed.
Then I set up the blocks to sew the first side, just like the first step in making a stitched biscornu.
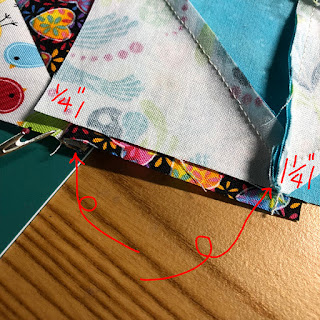
Unlike the stitched biscornu, I need to place these blocks right sides together to sew them. But before I sew, I need to slide each panel to offset the 1/4" ends (see the photo above, then the one here for the before-and-after the 'slide').
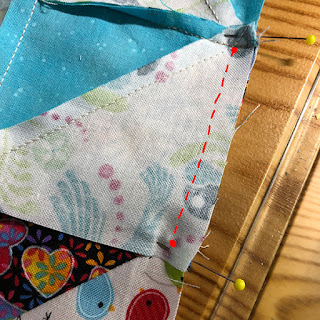
Notice that I'm also going to temporarily pull the vertical block seams out of the way (squiggly arrows) . . .
. . . to sew between the 1/4" seam allowances. I started and stopped with a back stitch at each end (so it looks like the first photo below, then the one below it, once sewn.
I continue to make my way around the edge, one side at a time, stopping and starting for each short side seam.
This is important! I had to remove a 1/4"-worth of stitching on the vertical and horizontal seam ends to allow the pieces to nestle together for sewing. (See the circled section in the photos above and below? - that's actually the same spot, even though one is at the top of the photo and the other is at the bottom of the photo)
Continue one side at a time around the block until all except one 'side' is sewn.
Looks like a hot mess. . .
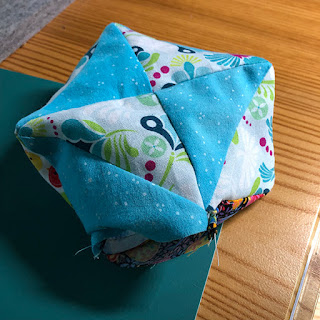
Then turn the biscornu inside out and it doesn't look so hot-messy anymore.
Add stuffin'. I like to use leftover wool batting scraps.
Then close that last seam with hand stitching.
I must say, I was getting a little anxious to see the result at this point, so my stitches aren't very tidy. But they did the trick.
Add a button to each side to tuft.
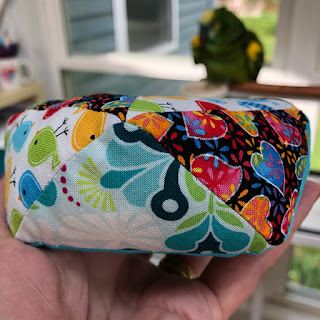
Ta-done! The 'top' view. Then the bottom view--Completely reversible!
And the side view.
Funny, I always have the strange feeling that 'someone' is watching me when I do this stuff. Wonder why?
Keeping it real. My first attempt (not pictured here) was a complete flop. Instead of a broken dishes block, I made pinwheel blocks. But I think the magic of the biscornu is the implied triangles that make the side view. Even on the stitched versions, most of the charts I've seen have a pattern that acknowledges that part of the top and bottom square panels that bends over the side in some way, and the pinwheel didn't do that, but the broken dishes block does.
Plus, attempt number 1 was too small, and it was really difficult to manipulate the seam allowances to get good side seams. Starting with the 3-1/2" scrap squares was much better.
If you're not a stitcher, it's nice to know that there's a quilty version of these cute, and take-my-word, very addictive wonky-shaped softies.
Give it a try? Let me know how it works. It'll cost you a few fabric scraps (who doesn't have those?) and a little bit of time. If you're not into dimensional stuff, this can be a little tricky, so if flat is your thing, this may not be for you. In the meantime, . . .
Happy Stitching!
Joan
PS: Do you receive my weekly Good Migrations newsletter? If not, scroll back up to the top of the sidebar on the right and fill in your name and email address to get stuff like this before it hits the blog. Get a bonus pattern when you do!
Pin this image to find this post again.
Thursday, May 16, 2019
Biscornu-ing . . . Again!
Earlier this year (or was it last year?) I discovered the addiction of biscornu-making. This book (affiliate link) does a really nice job of explaining the steps of the process and has a bunch of patterns.
Once you've made a couple biscornu, you realize that the process can be repeated with any sort of counted canvas type stitching, as long as the top and bottom design are back-stitch bordered with exactly the same number of stitches. The border must be a square, and must have an even number of stitches, divided easily.
I found this seagull pattern in the September issue of Cross Stitcher Magazine. I made up the blackwork pattern on some graph paper and used the same thread color combination on top and bottom, so they 'match' even though they don't 'match.' Once both panels were completely stitched and bordered, I was ready for the last few steps.
To make the wonky, zig-zaggy shape, you place the corner of the top panel, centered on one side of the bottom panel. A pin or two keeps things in place.
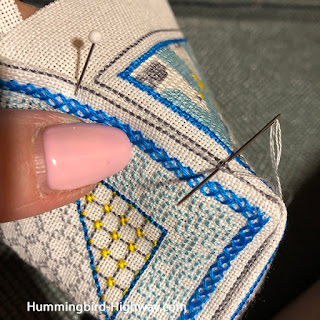
Notice that both panels are right sides up, unlike in quilting where something like this would be placed right sides together. Then I whip-stitched each and every backstitch loop, grabbing thread only, not canvas with each pass.
Turning the corner can be a little tricky, but following a one-stitch-at-a-time process, the corner is tackled. The pin placed strategically where the center and corner meet helped to keep me on track.
When I reach the last side, I stop.
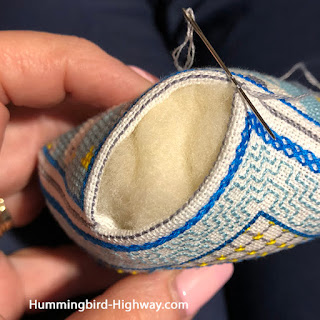
Since I use wool batting for my quilts, I have lots of leftover bits that make perfect biscornu/pin cushion stuffing.
I like them stuffed really generously, then I'm ready to finish the stitching along the last edge to close it all up.
Once stitched, a small mini-button adds the final touch to a tufted, squishy, irresistible addition to my collection!
And there you have it!
Cross stitch top . . .
. . . and blackwork bottom.
Of course, this one is completely reversible.
The finishing whip-stitch process takes me a good couple of hours paired with audio book or TV time, and it's pretty detailed work.
What's next?
I have about a million things I can pull out of my to-get-done pile to work on next, but for some silly reason, this stack of 2-1/2" squares from a several-years-old Maywood Studios collection by Marti Michell was calling to me. Add a few stash fabrics and a requisite bird print and we'll see where this goes.
You know how it is, when the shiny new object (actually this little pack has been around for quite a while) calls, you have to answer!
I try to do at least an hour or two of machine sewing in the morning before transitioning to the computer where the daily tasks form a list about a mile long. Lately, small, easy projects and quick finishes are drawing me in, so I'm going with it. Evenings are for handwork projects like feeding the biscornu addiction.
Happy Stitching!
Joan
Thursday, May 9, 2019
Travel Time
Last week I headed south to Atlanta for some time with my business coach. Lots of new ideas in the works, for new programs and for The FLOCK.
Two weeks ago, I showed you a photo of this project in its earliest stages. It was just a pile of blocks and some fabric choices a couple weeks ago.
These blocks started as a Hardanger sampler, including, I think maybe 12 blocks. I made 5 of the (about) 4" square stitcheries, then I ran out of thread.
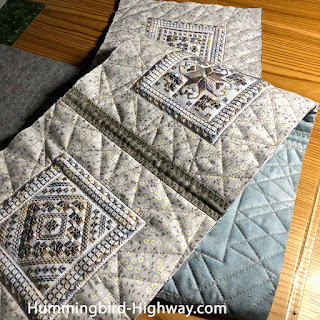
Sure, I could have purchased more thread in this color, but instead decided to add some borders (in quilting fabric) to each square and make something from the five blocks. Here you see the bordered blocks, layered and ready to pin-baste and quilt. Notice that I added an extra layer of fabric (the dark brown) under the quilt top to secure the batting beneath it. The embroidery has some cut-away sections, so an extra lining was needed.
With the layers sandwiched, I did some simple quilting to hold everything together.
Then added the binding.
As an afterthought, I felt that this runner could also hang on the wall in some of those narrow wall-spaces in my home, so I added a hanging sleeve.
The bound-but-not-sewn project went into my travel bag so that I could secure the folded edge of the binding to the back of the project during my flight.
Lucky me, I had an empty chair next to me on the plane and was able to finish up this project before the flight landed in Georgia!
Perfect use of flying time!
Here is a close up of one of the blocks.
Notice that I added some machine quilting within the hand stitching area to keep the puffed-up-center-effect down.
In between everything, I'm making progress on this blue-and-green Split the Check quilt (pattern found in the book ScrapTherapy, The Versatile Nine Patch)
This project is in preparation for an upcoming cruise - not the 2020 Hawaii cruise - that's going to be a different, all-new project TBD). This is for a 2021 cruise that has not been announced yet. Stay tuned.
Finally, the travel project that made it from my basket of projects into my travel bag is this little cross-stitch seagull piece. The pattern is from the September 2018 issue of Cross Stitcher magazine.
I worked on it quite a lot, both on the plane and in the evenings at the hotel.
The pattern calls for these little seagulls to become a pin cushion. . . . . . .but I think I'm going to turn it into another entry into my biscornu collection. I created a plain blackwork panel design for the biscornu backing - it's shown, in progress, on the right side of the photo below, inside the hoop.
I suspect the little chart I made up could stand alone as its own little project. We'll see. . .
Happy Stitching!
Joan
Subscribe to:
Comments (Atom)


